Making Thanksgiving Guests Feel Welcome
I’ve been thinking a lot about making Thankgsiving guests feel welcome this year as we have a whole crew descending on the house tomorrow. I have to admit I’m not always the most prepared and generous host. I tend to barely finish my work before guests arrive and plan most things on the fly. Not this year! This Thanksgiving my Mother-In-Law will be here from Chicago. She is a fabulous guest; one of the most helpful and supportive people to have in your home. My husband is not always the best communicator across long distances (I fear this doesn’t bode well for the attentiveness of my sons in the future, but that’s another worry for another day). I wanted to make sure she felt especially thanked and welcomed for traveling to visit us on such a busy holiday.
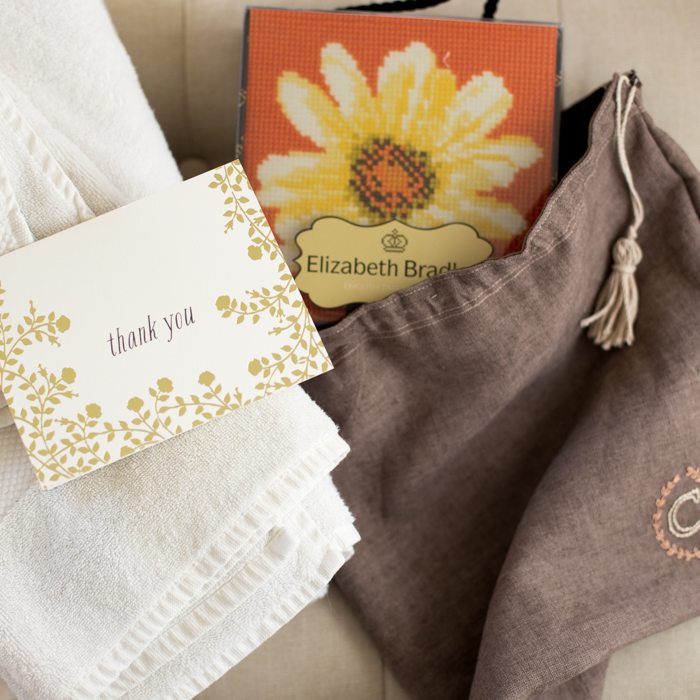
I decided to make her this charming hand embroidered project bag (tutorial below) filled with something I know she will love. I hope she doesn’t read this post and blow the surprise! Enclosed in the bag is a beautiful Elizabeth Bradley Mini Needlepoint Kit, which contains everything you need to complete the piece. My Mother-In-Law is a talented artist and maker herself; she loves needlepoint. How wonderful to welcome her with a little gift of something I know she will enjoy and be able to do during her stay. Elizabeth Bradley tapestry kits are mostly traditional in style. I think some of her pieces are versatile for the modern maker, such as the Victorian Animals, which have a retro look that would lend just the right touch to today’s modern decor, akin to a dark oil painting in a bright, white kitchen. I love these fish and the blooms, too. Also, don’t forget to leave a beautiful thank you note-hand written thoughts go a long way to making your Thanksgiving guests feel cherished!
The project bag is lined with a heavier cotton chino to keep needles and scissors from poking through, while the outside is a beautifully textured linen, hand embroidered to give it a personalized touch. The bag has a flat bottom and is stiff enough to stand, with contrasting stitch detail at the top. I made the bag in an afternoon, and yet, I think it will mean so much to her.
In addition to that, I decided to up my game from the typical kitchen walk-though (are you hungry?). This time, I planned a delicious hors d’oevres (recipe below, nothing too complicated!) to be served with a chilled glass of her favorite white wine.
It is so easy and yet so civilized to take the little bit of extra time and to make a handful of special bites–a perfect way to kick off our time together. Plus, who doesn’t need a glass of wine and yummy food coming off of those paltry airplane rides these days?

Recipe for Goat Cheese & Cranberry Apple Conserve Triscuit Hors D’oevres
The recipe for these hors d’oeuvres is simple and easy and the result colorful and festive. Why don’t I do this more often!? The sweet and moist cranberry along with the earthy thyme and sage complimented the flavorful cracker topped with a smooth and creamy goat cheese just right. Perfect for Thanksgiving guests!
Ingredients
Goat cheese from Fairy Tale Farm Cheeses,
Cranberry Apple Conserve (pre-made from Whole Foods) but this Cranberry Sauce from Joy of Cooking would be perfect if you want to make from scratch
Fresh thyme
Limited Edition Triscuit Cranberry and Sage cracker
1. Place small slice of goat cheese on Triscuit.
2. Top with one or two cranberries from your conserve or sauce.
3. Add a little bit of thyme to the top.
4. Plate with some thyme sprigs and enjoy!
DIY Hand Embroidered Lined Project Bag Tutorial
Materials
13" x 26" piece of linen
13" x 26" piece of mid-weight cotton chino or canvas
Initial printed to desired size (this “c” is in the font Footlight)
Free laurel or wreath printable like this one from We Lived Happily Ever After (overall measurements for motif were 1.5" x 2")
Fabric scissors
Embroidery scissors
Sulky Solvy
Fine point sharpie pen
Size 4 embroidery hoop (not shown above)
Embroidery needle
DMC embroidery thread (two colors)
Sewing machine
Contrasting thread
Darning needle or safety pin (not shown above, for threading twine through drawstring sleeve)
Cotton twine
:: Print out monogram in desired font and decorative wreath of your choosing. Motif should be sized to about 1 1/2 x 2". I layered the font and wreath together in illustrator for sizing purposes before I printed, but you could easily print them out individually and tape them together. Tape your motif to a smooth surface. Tape a piece of the Sulky Solvy on top of the monogram. Trace the motif on to the Sulky Solvy with a fine point Sharpe pen. Sulky Solvy is an easy way to transfer an embroidery motif onto fabric while stabilizing the fabric at the same time. This material dissolves in water after one minute but we won’t do this until you’re done stitching!
:: Untape Sulky Solvy from table surface and place on linen (outer) fabric so motif is approximately 7 inches down from the top and 2 inches in from the right side. (Construction of this bag folds the entire 26" length in half, so the motif will be embroidered about four inches up from the halfway point of the bag fabric’s length).
:: Embroider monogram with a simple back stitch, making stitches as even as you can. The laurel stems in this motif are created with a back stitch beginning and ending at each leaf junction. The daisy chain stitch makes the leaves in this motif. To do this, come up at the base of the leaf.
:: Go back down the same hole leaving a length of your thread in loop on top of your fabric which will become your leaf.
:: Bring the needle up through the fabric at the tip of the leaf and through the loop that is on top. Go back down just next to where you came up, catching the loop in your stitch as you bring the needle to the back of your work. Continue for each leaf in the motif.
:: Trim edges of Sulky Solvy close to embroidered motif (but don’t cut the stitches!)
:: Submerge piece in cold water. Sulky Solvy will dissolve. Make sure all little bits are gone.
:: Iron the reverse side of the fabric and let dry.
Note this is not your typical construction for a lined bag but it is faster and I think easier for a project like this.
:: Place liner fabric and outer fabric face-to-face with the right sides facing each other (i.e. the back of your embroidery will be facing out). Pin across the short ends. Using a contrasting color thread, sew a 3/8 inch seam across each end.
:: Press seams open at each end. Turn piece inside out so embroidery is facing out and seams are to the inside. The long sides will be open.
:: Top stitch the short ends at 1/8th of an inch from the edge. Repeat at the other end.
:: Add another line of stitches 3/4" in from the end to make your drawstring sleeve. Repeat at the other end.
:: Add a decorative line of stitches at 7/8 of an inch in from the end. Repeat on the other end.
:: Fold the double-layered piece in half with the lining facing out (the linen and your embroidery should be inside the fold. . Match the two drawstring sleeves at the top. Pin down the sides if desired. Beginning at the middle line of your drawstring sleeve (3/4" from top of bag), back stitch a few times and sew a half inch seam down the side of the bag. Repeat on the other side. The top 3/4" of the bag should be unattached at the sides.
:: Trim the seams down each side to a quarter of an inch.
:: Give the bag a bottom by stitching a triangle shape at each corner. To do this, start with the bottom of the bag facing up and the side seam facing you, give a pull on the sides of the bag out to make a triangle shape. The side seam will run straight down the top of the triangle. Sew a line across this triangle 1 1/4" in from the point.
:: Turn the bag inside out. Your embroidery motif should be located in the lower right hand corner of the bag. The bag should be able to stand upright sitting on its new bottom.
:: Thread one length of twine through the drawstring sleeve on one side and back through the other side using a darning needle or safety pin. With the bag undrawn, leave approximately six inches of length on each end. Tie these two ends together with a knot leaving three inches of length after the knot.
:: At the side of the bag without the twine ends. Fold edges in 1/4".
:: Sew a wider, decorative stitch just at the very top of the drawstring sleeve (you don’t want to sew down the whole length or you’ll sew the drawstring cord down.)
I think the decorative stitching looks so pretty along the top of the bag.
Last but not least, I think the tassel adds the final touch.
:: Wrap a length of twine around three of your fingers about 12 times. Remove bundle from your fingers.
:: The bundle will be tied on to the tail of your drawstring.
:: With your drawstring tails, tie a square knot through the loop of your bundle, securing the top of your twine bundle against the knot of your drawstring.
:: With a 8" piece of twine, tie a knot around the bundle about 1/2" down from the top. Wrap around the bundle again and tie another knot.
:: Use a darning needle to bring the tails you just made back down through the part you just tied. (This keeps these ends from sticking out in funny ways).
:: Cut through the loops at the bottom of your tassel and trim evenly!
Thanks to Martha Stewart Living who sponsored this tutorial, recipe and post.


Leave a comment
This site is protected by reCAPTCHA and the Google Privacy Policy and Terms of Service apply.